

Hey all...I've read a lot of magnetizing tutorials, but most seem to gloss over some key parts leaving me frustrated. So I wanted to see if I could do a better job. Please leave comments.
For a list of the tools I use, please check out my Tools page.
The instructions to assemble a rhino are pretty straight forward and the rhino is arguably one of the easiest vehicles to assemble, so I will skip those parts and just show you the relevant sections for a Baal Predator. NOTE: I start with all the parts trimmed and I do test fittings before I glue any pieces. I used the 1/4" magnets for the sponsons and 1/8" for everything else in this tutorial.
First off, I’ll start with optional prep work.

1. OPTIONAL: I like to be able to magnetize the small ports so I can easily connect a Hunter Killer Missile or Storm Bolter pintle mount so it stays on until I want to take it off. In the picture, the two sprue bits are actually too long. They should be cut where the circle ends as the line shows. The middle plate of the rhino fits right along the line. On the turret in the picture, the circle is placed where the port will be on the top turret part. Sometimes I don’t want anything on the turret, but some days, I want to have the marine hanging out with a Storm Bolter screaming come get some! You don’t need to do this step, but it will be a lot more difficult to put into place once you assemble the model.
 2. To magnetize the ammo boxes to the turret, I fit the two top pieces together as shown in the picture above, and then put the magnets in place. They like to pop over the lip so I put each magnet in place and hold it with a finger until both are placed. NOTE: The two outer sets of magnets are not in perfect alignment the magnets on the ammo box side should be slightly further out than their corresponding magnets on the turret side. Once I have all three in place, I line up the two plastic bits so the magnets will hold them in the correct, flush alignment. Once I am satisfied with the placement of all the parts, I use the Krazy Glue to brush circles around the magnets lightly. I let the glue set for a few minutes before pulling the pieces apart to test how well the alignment works with the magnets. If you don't have it quite right, it's a lot easier to move the magnets now than once the glue completely dries.
  If you look closely, you can see on the turret piece (right), all the magnets have the black marker, and on the ammo box (left), they do not.
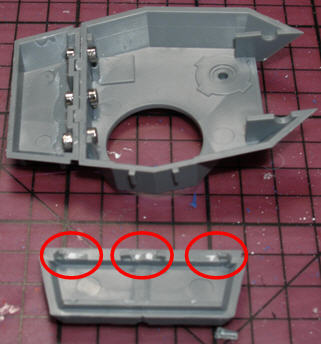
3. The next step is to trim off part of the tabs on the bottom ammo box piece. This needs to be done because the magnets now take that space. You can cut the whole tab off if you wish, I just cut off the inside halves of the outer tabs, and the middle section on the center tab as show in the red circles above.

4. I glue the assault cannon halves together, then super glue the magnets to the center of the diamonds shown above. It’s easier to keep magnets in place when the two cannon barrel sets are separate. The flamestorm cannon took more handling. (I glued one magnet in place, let it dry, then glued and had to hold the other one in place until it set)


5. I glued the two cannons together and placed them in to the mount as shown above, left. I flipped the mount over with the cannons in place, then applied super glue to the backs and slipped the magnets into position. The magnets from the cannons made the magnets on the turret slide around until they found the best position. I left the pieces together until the glue dried as shown above, right.
6. I apologize, I forgot to capture pictures so I'll use the post picture here. But you can now assemble the turret halves as shown; the ammo box and the turret with the weapon mount (no magnets here, just used the plastic nubs). I used super glue here because I will be swapping in and out pieces so I want it to stay together well. One final note, the weapon top armor plate does not need to be modified in any way; it fits nice and tight on to both the assault cannon and flamestorm cannon.

7. Now that the turret is assembled, set that aside and let the glue dry over night. I move on to the assembled halves of the rhino chassis. I start by gluing a 1/4" magnet on the center of the sponson mount, shown above, left. Let it dry or set until you’re comfortable it’s not going to come off. These are strong magnets and nothing is more of a pain in the butt than trying to separate two of these bad boys with super glue between them. Trust me. Once I have the magnet firmly attached to the sponson mount, I fit it into place in the outside of the rhino chassis (it only fits in one orientation). I put super glue approximately on the center of the inner door on the chassis and put the magnet in to place. Once again, the outside magnet slides this one into the strongest position. Leave sit until the glue is set, but you may as well do the other side while you wait. I mark the mounts with an L and R because they will have a stronger hold with the magnet you paired them with. NOTE: If you have already assembled the rhino chassis, never fear, you can do this same thing by pointing the glue nozzle into the top of the rhino fire point, putting a drop of glue in place, and popping the magnet on that way.
8. At this point, you can go ahead and assemble the rest of the rhino chassis. I also put a small bit of Krazy Glue on the rear door because I want to tack it closed. Strong enough to hold it in place, but not so strong that I can’t pull it open later if for some crazy reason I feel the need to. I don’t glue the fire point/turret mount in to place on the rhino chassis. Sometimes I want to run this as a rhino or razorback so I like the flexibility that adds. I’m not saying it is the most logical, I mean this is a Baal Predator and an awful expensive way to field a rhino. ;)


9. All we have left to assemble is the side sponsons. It is really tough to try to glue the top plate in, then fit the swivel and then try to get the bottom plate in place. Found it a lot easier to dry fit the bracket bits together and fit them to the sponson mount as shown above, right. Then glue them up and slide them in place. One note, the weapon swivel is very tight and doesn’t turn very easily so I took sand paper to file down the pegs so the swivel would turn easier.
10. I did not magnetize the weapons that fit in to the mounting bracket because the pegs make a very tight connection. I may magnetize them if I ever feel a need, but for now, they do a fine job staying put.

Here you have the completed Baal with a second magnetized Baal to give you both views.
I hope this tutorial helps. Enjoy!
-Pavonis


Nice!
ReplyDeleteI like the pictures a lot because it is one thing to describe how you do something but it is way easier to see how it is supposed to look.
With this magnetization process it seems like you can make anything that starts as a rhino into anything else that shares a rhino chassis, which I think is the biggest benefit towards magnetization, the ability to customize your army.
-Krox
Absolutely. You should never buy a plain rhino when you could get the extra bits like a predator, whirlwind, razorback, etc. and still be able to run it as a rhino. Of course, if you don't want the extra bits, you can save a few bucks buying the rhino only. ;)
ReplyDeleteExcellent, I have a Baal on the way and this is going to be used. Thanks muchly!
ReplyDeleteNext vehicle I buy is getting mag'd. Thank you for making this.
ReplyDelete